Salesforce blog for those who want to get indepth knowledge.
Setup Federated Authentication (SAML) based SSO
Get link
Facebook
X
Pinterest
Email
Other Apps
SAML stands for “Security Assertion Markup Language” and it is Open standard for exchanging Authentication and Authorization between Systems. SAML based authentication is supported by all editions of Salesforce.
User Validation can be initiated by any one of below two types:
Service Provider Initiated SSO
Identity Provider (IDp) initioated SSO
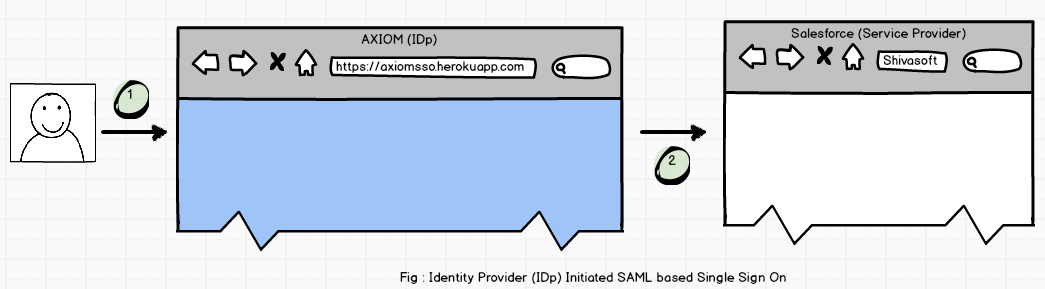
We are going to use Identity Provider Initiated SSO in this article. Means User will Login from Outside(IDp) and will be redirected to Salesforce (Service Provider). Identity Provider must follow Federated Authentication (SAML) standard which should be deployed to DMZ (URL should be publicly accessible on Internet) layer of your Organization. As a Salesforce developer you should assume that you will always get IDp URL which implements SSO and implements valid SAML response. To Quickly start with this tutorial assume that your organization already deployed SAML based Authentication endpoint and for that we will be using great Heroku app available freely as open source named “AXIOM“.
ID Initiated Single Sign On :
In IDP Initiated SSO, User Directly logins to Identity provider and IDP redirects user to proper Salesforce Instance with SAML assertion in request (Service Provider). If SAML assertion is valid then Salesforce validates that user successfully.
Step 1 : Enable My Domain
Step 2: Download Identity Provider Certificate
In this step we are going to get certificate from IDp. This certificate will be used by Salesforce to validate that client coming for user authentication is valid to avoid any unauthorized access to Service Provider (In our case it is Salesforce).
Introduction to Apex REST Salesforce platform is amazing and its lets your create your own lightweight REST API using Apex. You can use this REST API to access force.com data, by authenticating the caller/consumer of API using standard oAuth and return data format support JSON/XML, purely depends how you want return back the data A few useful bits of information related to these REST APIs: Use standard HTTP verbs: GET, POST, PUT, PATCH, DELETE, and HEAD. You can use either HTTP or HTTPS. Use standard security to authenticate your REST calls via OAuth 2.0. Serialize your data in either XML or JSON format. This is done by defining your Apex class with the @RestResource annotation to expose it as a REST resource. Similarly, add annotations to your methods to expose them through REST. For example, you can add the @HttpGet annotation to your method to expose it as a REST resource that can be called by an HTTP GET request. Ap...
Custom settings Custom settings are similar to custom objects in that they let you customize org data. Unlike custom objects which have records based on them, custom settings let you utilize custom data sets across your org, or distinguish particular users or profiles based on custom criteria. Before we start the example its just worth to mention that there are two types of custom settings List and Hierarchical. As of now lets discuss List type. Say for ex. we have to store data of states and its capital cities. So a state should have its capital associated with it. For this we can create a custom setting and store data in two fields. Custom setting default gives one field "Name" so this is our name of the state. So we need one more field to store the capital of the state "Capital". After our fields are created its time to create the data (States and its ...
Service Oriented Architecture with REST/SOAP in SFDC A service-oriented architecture is essentially a collection of services. These services communicate with each other. The communication can involve either simple data passing or it could involve two or more services coordinating some activity. Some means of connecting services to each other is needed. The technology of Web Services is the most likely connection technology of service-oriented architectures. The following figure illustrates a basic service-oriented architecture. It shows a service consumer at the right sending a service request message to a service provider at the left. The service provider returns a response message to the service consumer. The request and subsequent response connections are defined in some way that is understandable to both the service consumer and service provider. How those connections are defined is explained in Web Services Explained. A service ...

Comments
Post a Comment